Retrieve Image from MS-SQL Database in Android Studio

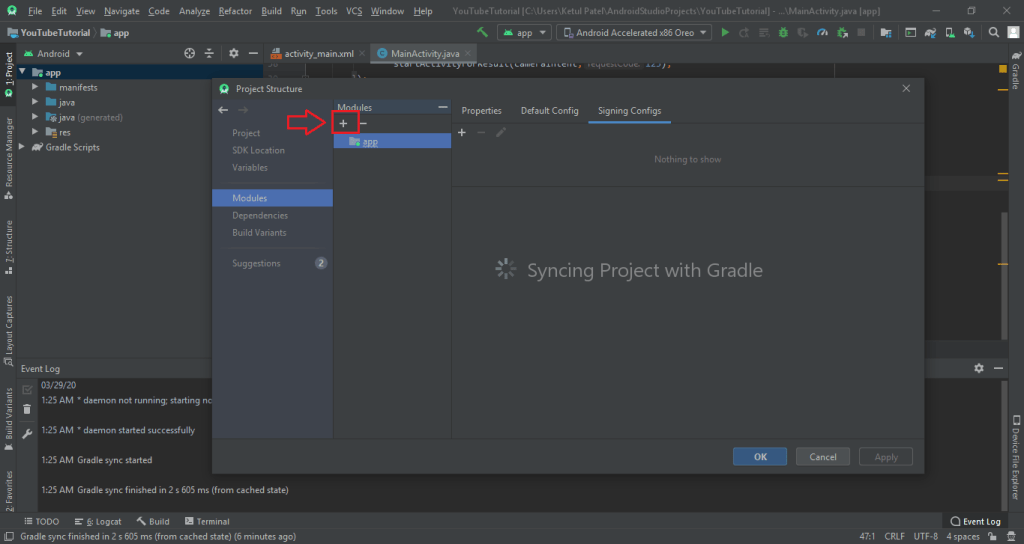
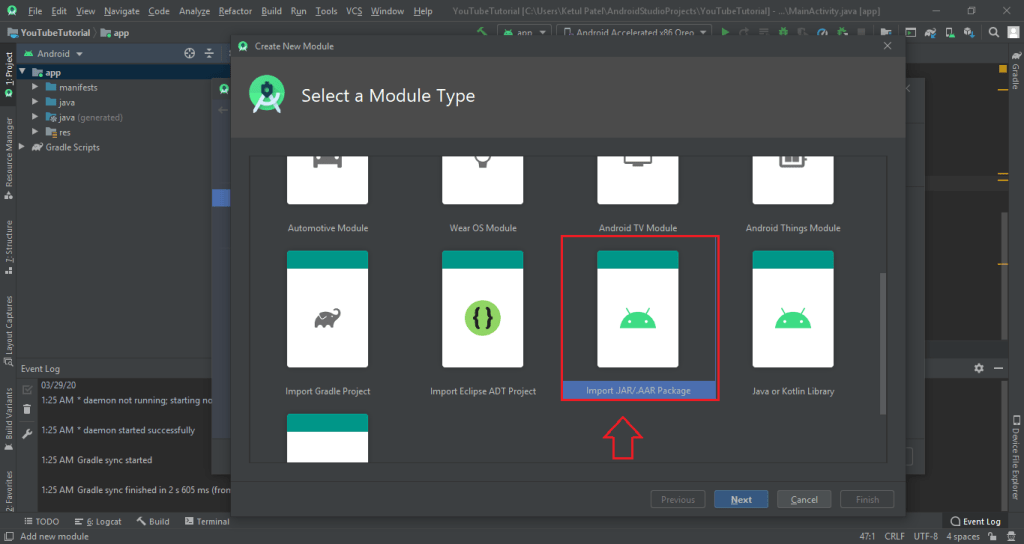
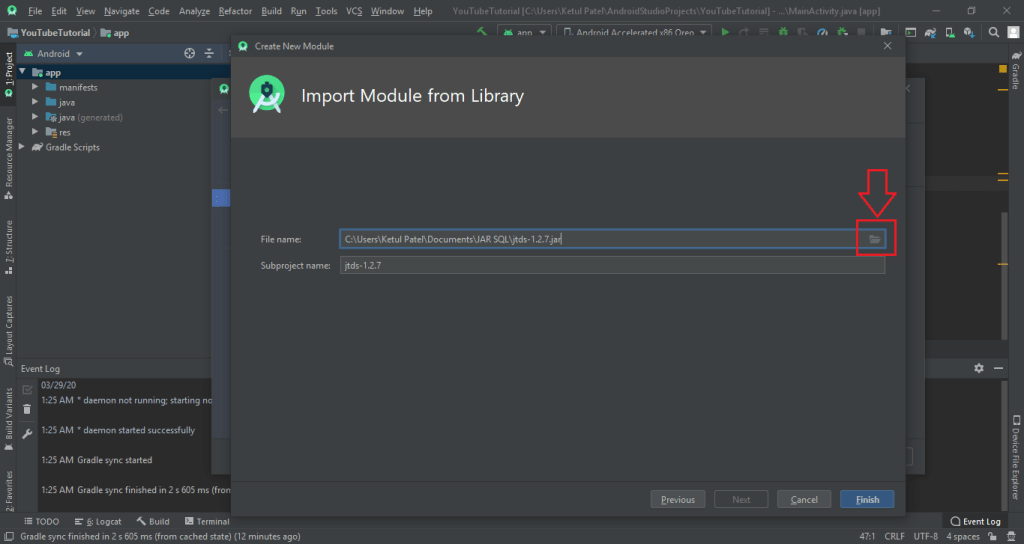
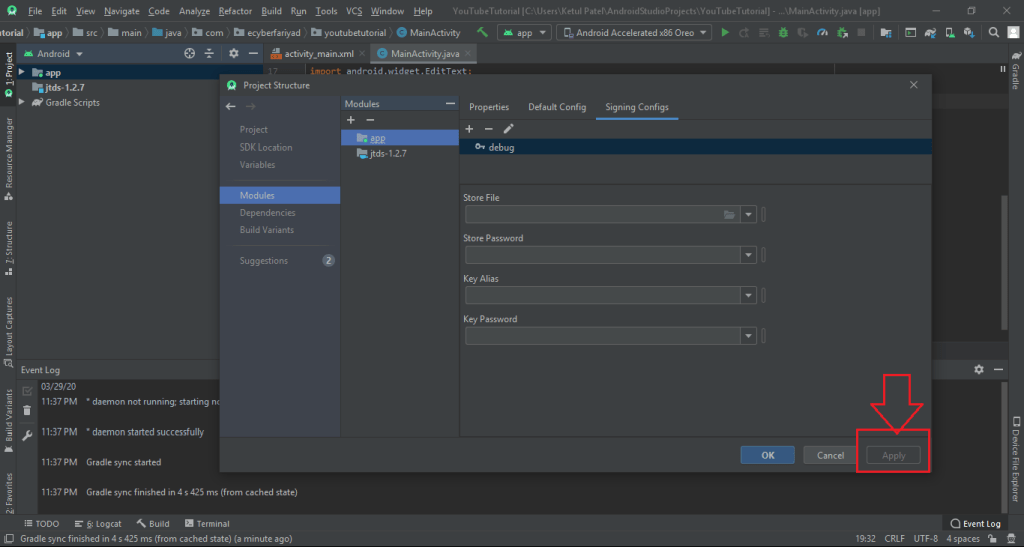
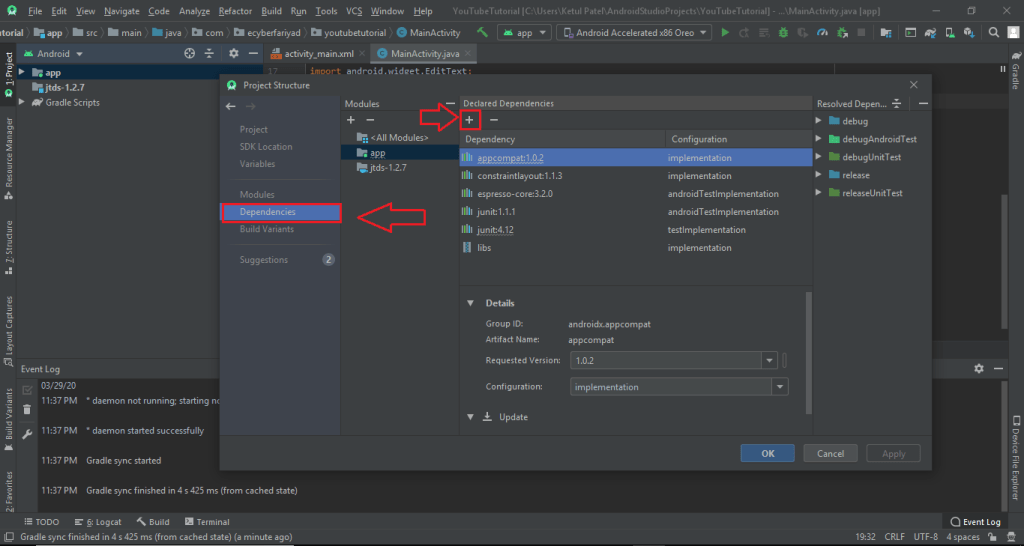
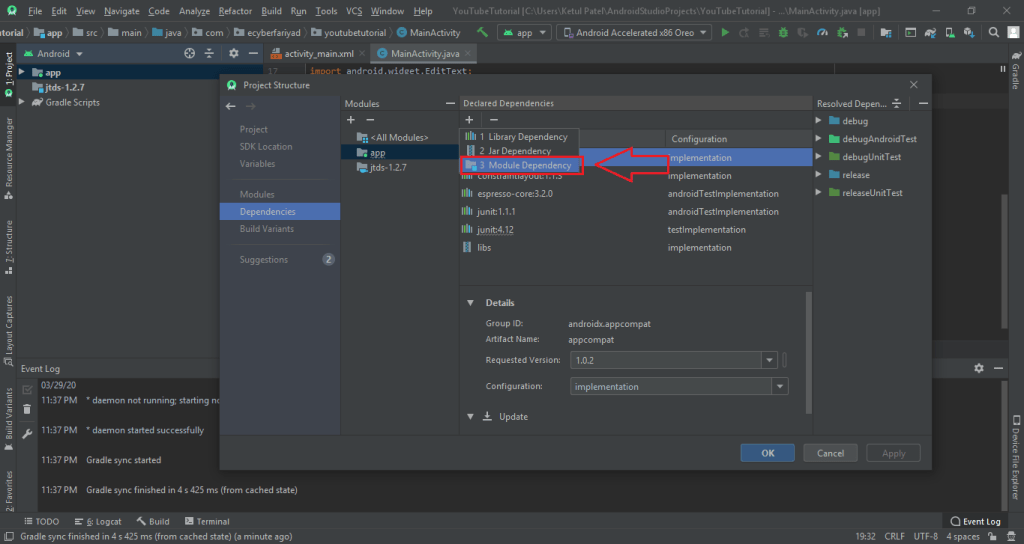
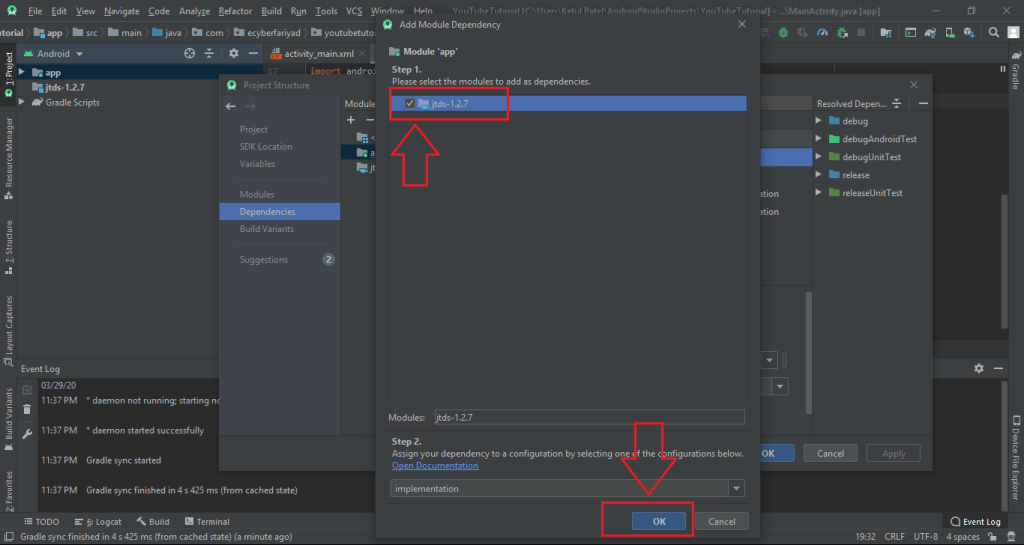
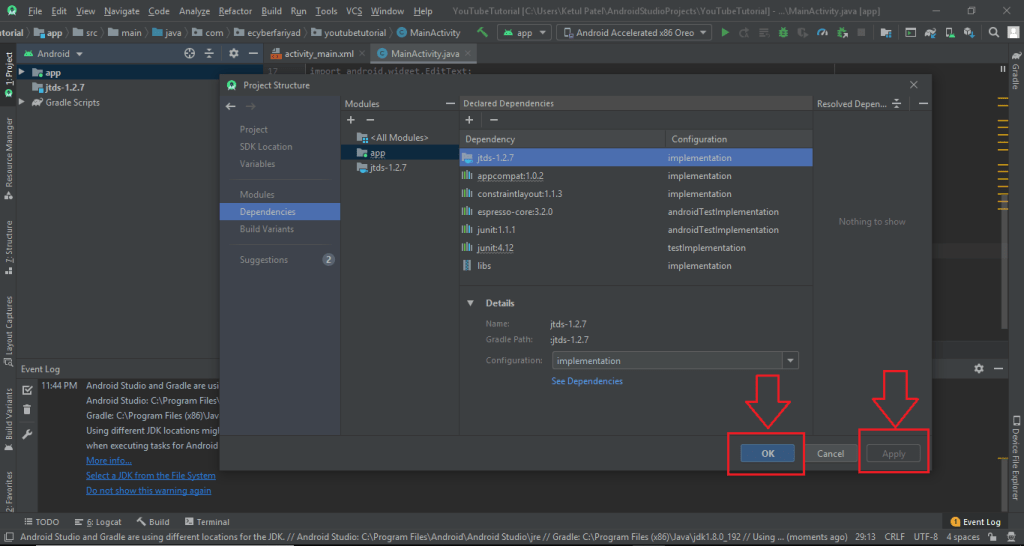
Following are the steps that will show you how to retrieve image from MS-SQL database in Android Studio.

(1) Step – 1 : Add following code in your layout resource file activity_get_image.xml.

<?xml version="1.0" encoding="utf-8"?>
<LinearLayout xmlns:android="http://schemas.android.com/apk/res/android"
xmlns:app="http://schemas.android.com/apk/res-auto"
xmlns:tools="http://schemas.android.com/tools"
android:layout_width="match_parent"
android:layout_height="match_parent"
android:orientation="vertical"
tools:context=".GetImageActivity">

<ImageView
android:layout_width="wrap_content"
android:layout_height="wrap_content"
android:id="@+id/imageSql"
android:layout_gravity="center"
android:layout_marginTop="@dimen/_50sdp"
/>

</LinearLayout>

(2) Step – 2 : Now add the following code to your java file GetImageActivity.java

public class GetImageActivity extends AppCompatActivity {

ImageView imageView;
Connection con;
Statement stmt;
ResultSet rs;

@Override
protected void onCreate(Bundle savedInstanceState) {
super.onCreate(savedInstanceState);
setContentView(R.layout.activity_get_image);

imageView = (ImageView)findViewById(R.id.imageSql);

try{
con = connectionClass(ConnectionClass.un.toString(),ConnectionClass.pass.toString(),ConnectionClass.db.toString(),ConnectionClass.ip.toString());
String query = "SELECT * FROM Image";

stmt = con.createStatement();
rs = stmt.executeQuery(query);

if(rs.next()){
String image = rs.getString("image");

byte[] bytes = Base64.decode(image,Base64.DEFAULT);
Bitmap bitmap = BitmapFactory.decodeByteArray(bytes, 0, bytes.length);

imageView.setImageBitmap(bitmap);
}
}catch (Exception e){
e.printStackTrace();
}
}


@SuppressLint("NewApi")
public Connection connectionClass(String user, String password, String database, String server){
StrictMode.ThreadPolicy policy = new StrictMode.ThreadPolicy.Builder().permitAll().build();
StrictMode.setThreadPolicy(policy);
Connection connection = null;
String connectionURL = null;
try{
Class.forName("net.sourceforge.jtds.jdbc.Driver");
connectionURL = "jdbc:jtds:sqlserver://" + server+"/" + database + ";user=" + user + ";password=" + password + ";";
connection = DriverManager.getConnection(connectionURL);
}catch (Exception e){
Log.e("SQL Connection Error : ", e.getMessage());
}

return connection;
}
}

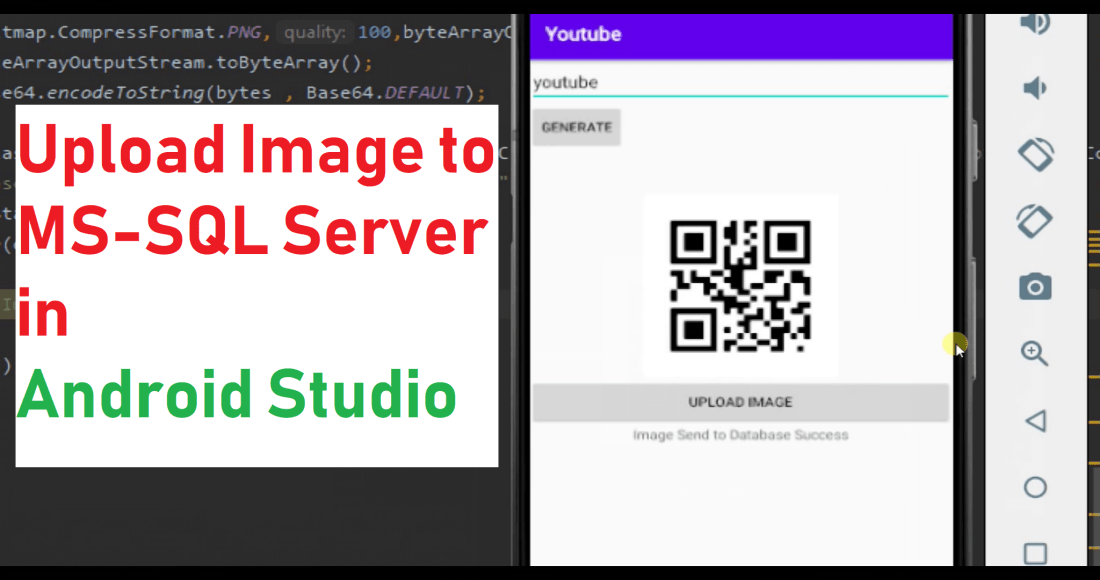
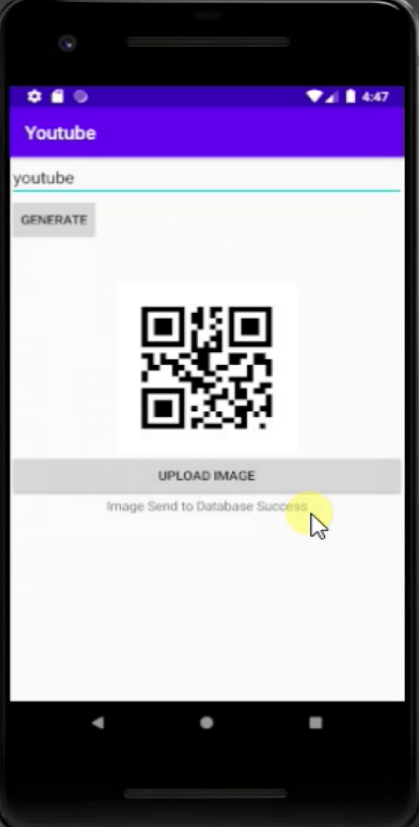
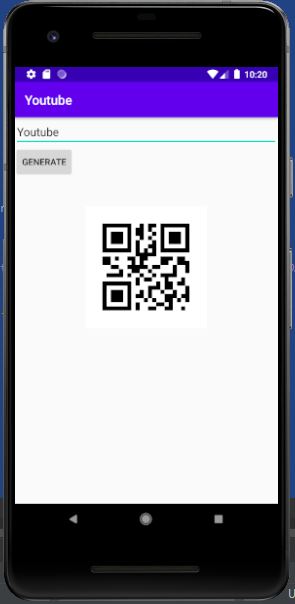
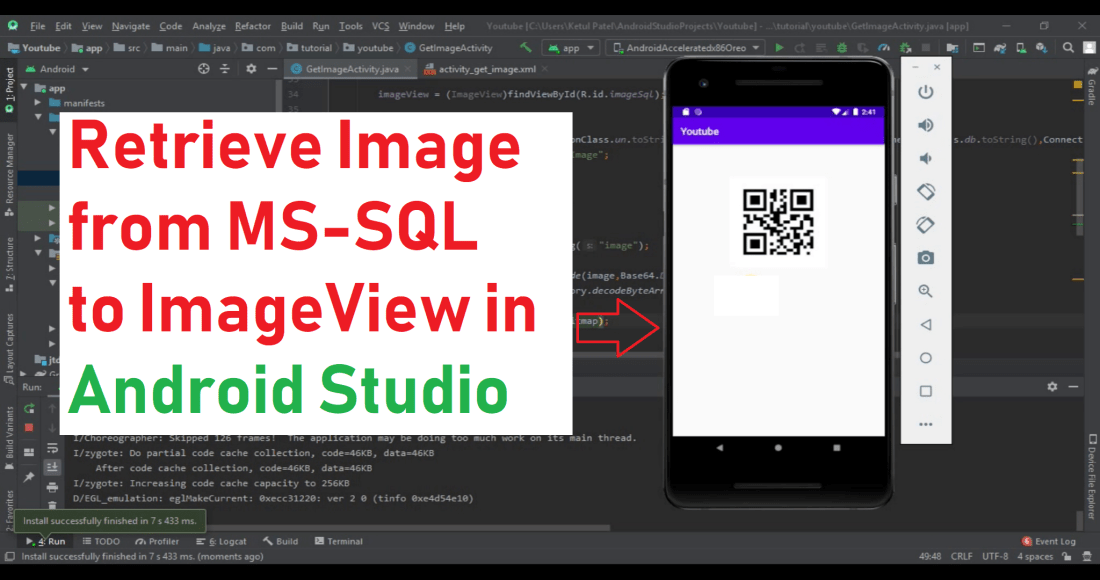
(3) Step – 3 : Following is the output of the program.

(4) Step – 4 : If you want to watch the tutorial just go to below link.

Upload an Image to MS-SQL Database in Android Studio

Following are the step to upload a image to MS-SQL database in Android Studio.

(1) Step – 1 : Add following in your activity_main.xml

<?xml version="1.0" encoding="utf-8"?>
<LinearLayout xmlns:android="http://schemas.android.com/apk/res/android"
    xmlns:app="http://schemas.android.com/apk/res-auto"
    xmlns:tools="http://schemas.android.com/tools"
    android:layout_width="match_parent"
    android:layout_height="match_parent"
    android:orientation="vertical"
    tools:context=".MainActivity">

<EditText
    android:layout_width="match_parent"
    android:layout_height="wrap_content"
    android:id="@+id/edittext"
    android:hint="Text"
    />

    <Button
        android:layout_width="wrap_content"
        android:layout_height="wrap_content"
        android:id="@+id/button"
        android:text="Generate"
        />


    <ImageView
        android:layout_width="wrap_content"
        android:layout_height="wrap_content"
        android:id="@+id/imageview"
        android:layout_gravity="center"
        android:layout_marginTop="@dimen/_35sdp"
        />


    <Button
        android:layout_width="match_parent"
        android:layout_height="wrap_content"
        android:text="Upload Image"
        android:id="@+id/qrbutton"
        />


    <TextView
        android:layout_width="match_parent"
        android:layout_height="wrap_content"
        android:id="@+id/status"
        android:text="Status"
        android:layout_gravity="center"
        android:textAlignment="center"
        />

</LinearLayout>

(2) Step – 2 : Now add following in your MainActivity.java.

public class MainActivity extends AppCompatActivity {

public class MainActivity extends AppCompatActivity {

    EditText editText;
    Button button,qrbutton;
    ImageView imageView;

    TextView textView;

    Connection con;
    Statement stmt;

    @Override
    protected void onCreate(Bundle savedInstanceState) {
        super.onCreate(savedInstanceState);
        setContentView(R.layout.activity_main);

        editText = (EditText)findViewById(R.id.edittext);
        button = (Button)findViewById(R.id.button);
        imageView = (ImageView)findViewById(R.id.imageview);
        qrbutton = (Button)findViewById(R.id.qrbutton);

        textView = (TextView)findViewById(R.id.status);

        qrbutton.setOnClickListener(new View.OnClickListener() {
            @Override
            public void onClick(View view) {
                new MainActivity.sendImage().execute("");
            }
        });

        button.setOnClickListener(new View.OnClickListener() {
            @Override
            public void onClick(View view) {
                MultiFormatWriter multiFormatWriter = new MultiFormatWriter();

                try{
                    BitMatrix bitMatrix = multiFormatWriter.encode(editText.getText().toString(),BarcodeFormat.QR_CODE,500,500);
                    BarcodeEncoder barcodeEncoder = new BarcodeEncoder();
                    Bitmap bitmap = barcodeEncoder.createBitmap(bitMatrix);
                    imageView.setImageBitmap(bitmap);
                    textView.setText("Image Created");
                }catch (Exception e){
                    e.printStackTrace();
                }
            }
        });
    }

    public class sendImage extends AsyncTask<String,String ,String>{

        @Override
        protected String doInBackground(String... strings) {
            String s = "false";
            try{
                textView.setText("Sending Image to Database");
                BitmapDrawable bitmapDrawable = (BitmapDrawable) imageView.getDrawable();
                Bitmap bitmap = bitmapDrawable.getBitmap();
                ByteArrayOutputStream byteArrayOutputStream = new ByteArrayOutputStream();
                bitmap.compress(Bitmap.CompressFormat.PNG,100,byteArrayOutputStream);
                byte[] bytes = byteArrayOutputStream.toByteArray();
                String image = Base64.encodeToString(bytes , Base64.DEFAULT);

                con = connectionClass(ConnectionClass.un.toString(),ConnectionClass.pass.toString(),ConnectionClass.db.toString(),ConnectionClass.ip.toString());
                String query = "insert into Image (image) values ('"+image+"')";
                stmt = con.createStatement();
                stmt.executeUpdate(query);
                s  = "true";
                textView.setText("Image Send to Database Success");
            }catch (Exception e){
                e.printStackTrace();
            }

            return s;
        }
    }


    @SuppressLint("NewApi")
    public Connection connectionClass(String user, String password, String database, String server){
        StrictMode.ThreadPolicy policy = new StrictMode.ThreadPolicy.Builder().permitAll().build();
        StrictMode.setThreadPolicy(policy);
        Connection connection = null;
        String connectionURL = null;
        try{
            Class.forName("net.sourceforge.jtds.jdbc.Driver");
            connectionURL = "jdbc:jtds:sqlserver://" + server+"/" + database + ";user=" + user + ";password=" + password + ";";
            connection = DriverManager.getConnection(connectionURL);
        }catch (Exception e){
            Log.e("SQL Connection Error : ", e.getMessage());
        }

        return connection;
    }

}

(3) Step – 3 : If you want to generate a QR-Code you can check following blog.

https://ketulpatel.code.blog/2020/05/21/generating-qr-code-in-android-studio/

(4) Step – 4 : Following is the output of the application.

(5) Step – 5 : If you want to watch full video you can visit the link below.

Generating QR Code in Android Studio

Following are the step to create a QR Code in Android Studio.

(1) Step – 1 : Add following two dependencies in build gradle.

implementation 'com.google.zxing:core:3.2.1'
implementation 'com.journeyapps:zxing-android-embedded:3.2.0@aar'

(2) Step – 2 : Now Create the layout for your application following is the example layout with an edit text, button and image view.

<?xml version="1.0" encoding="utf-8"?>
<LinearLayout xmlns:android="http://schemas.android.com/apk/res/android"
xmlns:app="http://schemas.android.com/apk/res-auto"
xmlns:tools="http://schemas.android.com/tools"
android:layout_width="match_parent"
android:layout_height="match_parent"
android:orientation="vertical"
tools:context=".MainActivity">

<EditText
android:layout_width="match_parent"
android:layout_height="wrap_content"
android:id="@+id/edittext"
android:hint="Text"
/>

<Button
android:layout_width="wrap_content"
android:layout_height="wrap_content"
android:id="@+id/button"
android:text="Generate"
/>


<ImageView
android:layout_width="wrap_content"
android:layout_height="wrap_content"
android:id="@+id/imageview"
android:layout_gravity="center"
android:layout_marginTop="@dimen/_35sdp"
/>

</LinearLayout>

(3) Step – 3 : Now write the business logic to generate the QR-Code in your java file.

import androidx.appcompat.app.AppCompatActivity;

import android.graphics.Bitmap;
import android.os.Bundle;
import android.view.View;
import android.widget.Button;
import android.widget.EditText;
import android.widget.ImageView;

import com.google.zxing.BarcodeFormat;
import com.google.zxing.MultiFormatWriter;
import com.google.zxing.common.BitMatrix;
import com.journeyapps.barcodescanner.BarcodeEncoder;

public class MainActivity extends AppCompatActivity {

EditText editText;
Button button;
ImageView imageView;

@Override
protected void onCreate(Bundle savedInstanceState) {
super.onCreate(savedInstanceState);
setContentView(R.layout.activity_main);

editText = (EditText)findViewById(R.id.edittext);
button = (Button)findViewById(R.id.button);
imageView = (ImageView)findViewById(R.id.imageview);

button.setOnClickListener(new View.OnClickListener() {
@Override
public void onClick(View view) {
MultiFormatWriter multiFormatWriter = new MultiFormatWriter();

try{
BitMatrix bitMatrix = multiFormatWriter.encode(editText.getText().toString(),BarcodeFormat.QR_CODE,500,500);
BarcodeEncoder barcodeEncoder = new BarcodeEncoder();
Bitmap bitmap = barcodeEncoder.createBitmap(bitMatrix);
imageView.setImageBitmap(bitmap);
}catch (Exception e){
e.printStackTrace();
}
}
});
}

}

(4) This are the simple steps to generate a QR-Code in Android Studio following is the output of the program.

(5) If you want to see the video you can also watch below.

Animated Splash Screen in Android Studio

Following are the steps to create animated splash screen in android studio :

(1) Step – 1 : Create a anim directory and than add a new animation resource file in it and name it splashscreentransition.xml

<?xml version=”1.0″ encoding=”utf-8″?>

<alpha

xmlns:android=”http://schemas.android.com/apk/res/android&#8221;
android:fromAlpha=”0.0″
android:toAlpha=”1.0″
android:duration=”2000″ />

(2) Step – 2 Create a Empty activity and name it as SplashScreenActivity and edit splashscreenactivity.xml

<LinearLayout xmlns:android="http://schemas.android.com/apk/res/android"
    xmlns:app="http://schemas.android.com/apk/res-auto"
    xmlns:tools="http://schemas.android.com/tools"
    android:layout_width="match_parent"
    android:layout_height="match_parent"
    tools:context=".SplashScreenActivity"
    android:orientation="vertical"
    >

 <LinearLayout
        android:layout_width="match_parent"
        android:layout_height="match_parent"
        android:orientation="vertical"
        android:gravity="center">

        <ImageView
            android:layout_width="100dp"
            android:layout_height="100dp"
            android:src="@mipmap/ic_launcher"
            android:layout_gravity="center"
            android:id="@+id/splashimg"/>
    </LinearLayout>

</LinearLayout>

(3) Step – 3 : Now write the backend code for SplashScreenActivity.java

public class SplashScreenActivity extends AppCompatActivity {
ImageView splashimg;

@Override
protected void onCreate(Bundle savedInstanceState) {
    super.onCreate(savedInstanceState);
    setContentView(R.layout.activity_splash_screen);

    splashimg = (ImageView)findViewById(R.id.splashimg);

    Animation splashAnim = AnimationUtils.loadAnimation(this,R.anim.splashscreentransion);
    splashimg.startAnimation(splashAnim);

    final Intent intent = new Intent(this,MainActivity.class);

    Thread timer = new Thread(){
        public void run(){
            try{
                sleep(5000);
            }catch (InterruptedException e){
                e.printStackTrace();
            }finally{
                startActivity(intent);
                finish();
            }
        }
    };
    timer.start();
}
}

(4) Now run and check the app to watch full tutorial watch the video.

Session Management in Android Studio

Following are easy steps to make a session manager in android studio

(1) Step – 1 : Create a Java class and name is as SessionManager.java

public class SessionManager {

SharedPreferences pref;

SharedPreferences.Editor editor;

Context _context;

int Private_mode = 0;

private static final String PREF_NAME = "AndroidHivePref";

private static final String IS_LOGIN = "IsLoggedIn";

public static final String KEY_EMAIL = "email";

public static final String KEY_PASSWORD = "password";


public SessionManager (Context context){
    this._context = context;
    pref = _context.getSharedPreferences(PREF_NAME, Private_mode);
    editor = pref.edit();
}

public void createLoginSession(String email, String password){
    editor.putBoolean(IS_LOGIN,true);

    editor.putString(KEY_EMAIL, email);

    editor.putString(KEY_PASSWORD, password);

    editor.commit();
}

public boolean isLoggedIn(){
    return pref.getBoolean(IS_LOGIN, false);
}

public void checkLogin(){
    if(!this.isLoggedIn()){
        Intent i = new Intent(_context, LoginActivity.class);
        i.addFlags(Intent.FLAG_ACTIVITY_CLEAR_TOP);
        i.setFlags(Intent.FLAG_ACTIVITY_NEW_TASK);

        _context.startActivity(i);
    }
}

public HashMap<String , String> getUserDetails(){
    HashMap<String, String> user = new HashMap<String, String>();

    user.put(KEY_EMAIL, pref.getString(KEY_EMAIL,null));

    user.put(KEY_PASSWORD, pref.getString(KEY_PASSWORD,null));

    return user;
}

public void logoutUser(){
    editor.clear();
    editor.commit();

    Intent i = new Intent(_context, LoginActivity.class);
    i.addFlags(Intent.FLAG_ACTIVITY_CLEAR_TOP);
    i.addFlags(Intent.FLAG_ACTIVITY_NEW_TASK);

    _context.startActivity(i);
}
}

(2) Step – 2 : Add following in the MainActivity.java’s on create method.

SessionManager sessionManager;

sessionManager = new SessionManager(getApplicationContext());
sessionManager.checkLogin();

(3) Step – 3 : Add following in the LoginActivity.java where user credentials are checked and return true.

sessionManager.createLoginSession(email.getText(),password.getText());

(4) Step – 4 : Add following in the LoginActivity.java’s on Create method.

SessionManager sessionManager;

sessionManager = new SessionManager(getApplicationContext());

(5) Step – 5 : Check the full tutorial video.

Registration Page in Android Studio Using MS-SQL.

This blog will guide how to make a registration page in android studio and store the value in MS-SQL database by following below simple steps :

(1) Step – 1 : Create a database in SQL Server and Create a table register in it.

(2) Step – 2 : Now in Android Studio open AndroidManifest.xml and add :

          <uses-permission android:name="android.permission.INTERNET"/>

(3) Step – 3 : Now create RegisterActivity and design the register page that is activity_register.xml :

<?xml version="1.0" encoding="utf-8"?>
<LinearLayout xmlns:android="http://schemas.android.com/apk/res/android"
    xmlns:app="http://schemas.android.com/apk/res-auto"
    xmlns:tools="http://schemas.android.com/tools"
    android:layout_width="match_parent"
    android:layout_height="match_parent"
    android:orientation="vertical"
    tools:context=".RegisterActivity">

    <EditText
        android:layout_width="match_parent"
        android:layout_height="wrap_content"
        android:textSize="25dp"
        android:id="@+id/name"
        android:hint="Name"/>
<EditText
        android:layout_width="match_parent"
        android:layout_height="wrap_content"
        android:textSize="25dp"
        android:id="@+id/email"
        android:hint="Email"
        android:inputType="textEmailAddress"
        />

    <EditText
        android:layout_width="match_parent"
        android:layout_height="wrap_content"
        android:textSize="25dp"
        android:id="@+id/password"
        android:hint="Password"
        android:inputType="textPassword"
        />

    <Button
        android:layout_width="match_parent"
        android:layout_height="wrap_content"
        android:text="Register"
        android:id="@+id/registerbtn"
        />

    <TextView
        android:layout_width="match_parent"
        android:layout_height="wrap_content"
        android:id="@+id/status"
        android:textSize="25dp"
        android:layout_marginTop="20dp"
        android:text="Register"
        />
</LinearLayout>

(4) Step – 4 : Now create a Connection Class Package to define the connection properties to SQL server that is Connection -> ConnectionClass.java

public class ConnectionClass {
public static String ip = “”;
public static String un = “”;
public static String pass = “”;
public static String db = “”;
}

(5) Step – 5 : Now write down business logic for register page that is RegisterActivity.java :

EditText name,email,password;
Button registerbtn;
TextView status;
Connection con;
Statement stmt;

@Override
protected void onCreate(Bundle savedInstanceState) {
    super.onCreate(savedInstanceState);
    setContentView(R.layout.activity_register);

    name = (EditText)findViewById(R.id.name);
    email = (EditText)findViewById(R.id.email);
    password = (EditText)findViewById(R.id.password);
    registerbtn = (Button)findViewById(R.id.registerbtn);
    status = (TextView)findViewById(R.id.status);

    registerbtn.setOnClickListener(new View.OnClickListener() {
        @Override
        public void onClick(View v) {
                new RegisterActivity.registeruser().execute("");
        }
    });
}

public class registeruser extends AsyncTask<String, String , String>{

        String z = "";
        Boolean isSuccess = false;

        @Override
        protected void onPreExecute() {
            status.setText("Sending Data to Database");
        }

        @Override
        protected void onPostExecute(String s) {
            status.setText("Registration Successful");
            name.setText("");
            email.setText("");
            password.setText("");
        }

        @Override
        protected String doInBackground(String... strings) {
            try{
                con = connectionClass(ConnectionClass.un.toString(),ConnectionClass.pass.toString(),ConnectionClass.db.toString(),ConnectionClass.ip.toString());
                if(con == null){
                    z = "Check Your Internet Connection";
                }
                else{
                    String sql = "INSERT INTO register (name,email,password) VALUES ('"+name.getText()+"','"+email.getText()+"','"+password.getText()+"')";
                    stmt = con.createStatement();
                    stmt.executeUpdate(sql);
                }

            }catch (Exception e){
                    isSuccess = false;
                    z = e.getMessage();
            }

            return z;
        }
    }


    @SuppressLint("NewApi")
    public Connection connectionClass(String user, String password, String database, String server){
        StrictMode.ThreadPolicy policy = new StrictMode.ThreadPolicy.Builder().permitAll().build();
        StrictMode.setThreadPolicy(policy);
        Connection connection = null;
        String connectionURL = null;
        try{
                Class.forName("net.sourceforge.jtds.jdbc.Driver");
                connectionURL = "jdbc:jtds:sqlserver://" + server+"/" + database + ";user=" + user + ";password=" + password + ";";
                connection = DriverManager.getConnection(connectionURL);
        }catch (Exception e){
            Log.e("SQL Connection Error : ", e.getMessage());
        }

        return connection;
    }
}

(6) Step – 6 : Run the project and test it. To check the whole process go to the link below :

Connecting Android Studio with MSSQL or MYSQL

This blog will show how to add MSSQL or MYSQL server to Android Studio.

Following are the steps that you should follow :

(1) Step – 1 : Download the Jar files of MSSQL or MYSQL as per your need. Both file link are attached below. (Note : You only need one file as per your project requirement if you are using MSSQL then only add MSSQL Jar file and Vice-Versa.)

https://drive.google.com/drive/folders/115-zpMBVpgcXsUyyD-tR9Pz1FWmF7gv-?usp=sharing

(2) Step – 2 : Now create the project or open already created project in Android Studio.

(3) Step – 3 : Now Right Click on your project and then Open Module Setting as shown in the image below.

(4) Step – 4 : Now click on the + button as shown in the image below.

(5) Step – 5 : Now scroll down and click on Import .JAR/.AAR Packages and cick next as shown in the image below.

(6) Step – 6 : Now select the JAR file from your system and click finish as shown in the image below.

(7) Step – 7 : Now click on apply button so that the JAR files gets Sync with project as shown in image below.

(8) Step – 8 : Now click on Dependencies and than click on + icon as shown in the image below.

(9) Step – 9 : Now click on Module Dependencies as shown in the image below.

(10) Step – 10 : Now click on the module file and click on Ok button as shown in image below.

(11) Step – 11 : Now click on apply and ok button as shown in the image below.

(12) Step – 12 : Finally the server is added to android studio to see whole process video go to the link below.

Open Camera in Android Studio

Following is the source code for two files (1) activity_main.xml and (2) MainActivity.java

(1) activity_main.xml

<Button
    android:id="@+id/camerabtn"
    android:layout_width="wrap_content"
    android:layout_height="wrap_content"
    android:layout_gravity="center"
    android:text="Camera" />

<ImageView
    android:layout_width="match_parent"
    android:layout_height="match_parent"
    android:id="@+id/imageview"
    android:layout_below="@+id/camerabtn"
    />

(2) MainActivity.java

public class MainActivity extends AppCompatActivity {

Button camrebtn;
ImageView imageView;

@Override
protected void onCreate(Bundle savedInstanceState) {
    super.onCreate(savedInstanceState);
    setContentView(R.layout.activity_main);

    camrebtn = (Button)findViewById(R.id.camerabtn);
    imageView = (ImageView)findViewById(R.id.imageview);

    camrebtn.setOnClickListener(new View.OnClickListener() {
        @Override
        public void onClick(View v) {
            Intent cameraIntent = new Intent(MediaStore.ACTION_IMAGE_CAPTURE);
            startActivityForResult(cameraIntent,123);
        }
    });


}

protected void onActivityResult(int requestCode, int resultCode, Intent data){
    if(requestCode == 123){
        Bitmap photo = (Bitmap)data.getExtras().get("data");
        imageView.setImageBitmap(photo);
    }
}
}

(3) OUTPUT

Camera Activity to Capture Image
Image Captured and Stored in